Wednesday, June 27, 2012

A New Sewing Chair


I have been looking for a new sewing chair since Mother's Day when my husband and son gave me a great new sewing table that closes into a console table! It was so pretty that I knew I needed something equally pretty to sit next to it when it is closed up. And I was getting pretty tired of sewing while sitting on an ottoman! 

Well . . . I finally stumbled upon a beautiful (yet horribly dirty) chair at the thrift store for $8.99! Could it get any better?


As soon as I got it home I quickly got to work! I unscrewed the seat and began ripping off the fabric! I also cleaned up all the gross stains that were all over the wood and slathered on a coat of primer.

(The little rocking chair in the background was a steal at $5.00 that I could not pass up! It will be featured later. I am sure I was quite the sight pushing a stroller and juggling 2 chairs and a plant stand on that trip.)

Back to this chair. I followed up primer with a light sanding to smooth it out and began applying a nice off -white paint. While this dried I recovered the cushion (luckily the padding was all still in great shape so it was simply a matter stapling new fabric on)!

I was going to call it quits at this but I thought the top design was just so unique that I wanted to make the detailing pop . . . so I grabbed my living room's ceiling paint and carefully painted in the details on the chair! 


The chair then got 3 coats of varnish, the seat re-applied and it was all set! I have already used it a bunch while sewing. Much more comfortable than that darn ottoman and so much cuter too . . . wouldn't you agree?!


Pin It

Sunday, June 24, 2012

Simple Side Table From Plant Stand


So a few weeks ago I was doing my usual digging through our thrift store and I found this wooden plant stand. For some reason it struck me, even though I think I may have over-payed at $12.99 but there's no looking back now. This is a very simple project but there will be some very neat projects wrapping up in the near future!

The plant stand was originally a dark red with a lot of water staining on top. I started by sanding down the top so all the wood was once again even. I then roughed up the rest of the stand by lightly sanding with some 80 grit sandpaper. I then busted into a can of my new best friend, Zinsser Cover Stain!

I coated the whole piece with 2 light coats of primer!


I lightly sanded after priming to keep everything smooth and followed up with 2 coats of some extra paint we had from our living room ceiling while lightly sanding between coats. This was then followed up by 3 coats of Minwax's Water-Based Polycrylic Protective Finish.

I was left with a perfect stand that I will be using as a tall side table. It is just tall enough that my little guy can't reach up and swipe everything down from it! Plus it is nice and skinny which keeps my smaller living room from feeling too cluttered. 


Once I finish re-decorating our living room on a thrifty budget I will have to post pictures of how all my new-old pieces look all put together! :)


Pin It

Tuesday, June 19, 2012

A Must-Have for Sleepovers: Pillow Mattress


Once again I found myself motivated by something I saw on Pinterest . . . I am totally loving that site! If you aren't already a member I highly suggest you get started, it is a great place to find inspiration. In any case, I had seen someone who had posted a picture of children lounging on these awesome mattresses that appeared to be made of bed pillows. I knew I wanted it for my own son but I wanted to adjust it to have more boyish fabrics.

After a night of planning and 2 nights of sewing, this is what I came up with! 


Keep reading to find out how you can make your own . . . of course, if you love the pillow mattress but don't sew or just would prefer to purchase it, please feel free to contact me at seamssewprecious@gmail.com about purchasing one! I love to create custom items!

I am providing this tutorial for personal use . . . please feel free to use my pattern for gifting or for your own use. This is not to be used to create items for sale. 

---------------------------------------------------------------------------
Supplies:

- Poster board, cardboard, or other large piece of thicker paper
- 1 yard solid cotton fabric (turquoise for front)
- 2 yards solid cotton fabric (gray for back)
- 1 yard cotton fabric with print (guitars for front)
- Coordinating thread
- 4 Pillows
---------------------------------------------------------------------------

Start off by creating a pattern for the front of the mattress. I took some posterboard and cut it to be 28 inches by 20 inches. 

Use your pattern to cut 4 pieces of fabric, in my case I cut 2 of my cotton guitar print and 2 of my coordinating solid (turquoise). 


I then took my other solid cotton fabric (gray) and cut 2 pieces measuring 20 inches by 60 inches. I wanted the top of my back to match the top of the mattress (if you want your entire back to be solid you would cut a piece measuring 20 inches by 80 inches). I then took my cotton print and cut two pieces measuring 20 inches by 20 inches. At this point I suggest ironing all of your pieces to be nice and flat. If you want to personalize your mattress now would be the time to embroider. I embroidered one of the turquoise rectangles with black font exactly in the middle.


Pin 2 of your front rectangles together on one long side, right sides together and sew a seam.


(P.S. Sorry for the cluttered pics . . . this was worked on in my living room amidst toys and other items)

Repeat above step for the remaining front pieces until all 4 are sewn together forming 1 long piece. If you are using 2 different fabrics for the back, as I did, then pin one of the 20 inch by 60 inch pieces to a 20 inch by 20 inch piece, once again right sides together (if you are using one color on the back then skip this step). Sew together and repeat for the other piece. 


Take your now 20 inch by 80 inch pieces and create a hem along one of the long sides. Be sure to do opposite sides (i.e. one piece will have a hem on the right and one will have a hem on the left). 


Take one of your 20 inch by 80 inch pieces and pin the unfinished edge along an edge of the front of your mattress with right sides together. Sew around the 3 edges. 


Repeat this step with your remaining 20 inch by 80 inch piece. Your seams along the shorter ends will overlap with the previous piece. 


Flip everything to be right side out. Smooth everything out and pin along front seams to hold back fabric smoothly in place. Sew seams along front seams, forming 4 individual pillow cases in the process. 


Now you are ready to "stuff" your mattress. I bought 4 very cheap ($2.50 each) standard pillows from Wal-Mart.


For my under 1 year old these pillows will be perfect for getting spit up on, leaked on, and any other accidents that may occur before he is even long enough to fill this mattress out. If this is for an older child I suggest stuffing with a better pillow. These proved to be very thin when my husband and I sat with him on the mattress tonight. I will be keeping my eyes out for some fluffier clearance pillows in the future!


Voila . . . a fabulous pillow mattress! Perfect for road trips, sleepovers and lounging around for movie nights! Even better for mom since you can disassemble as needed for easy washing! ;)

(Fold top pillow under to create a little headrest when watching t.v.)

Pin It

Monday, June 18, 2012

Re-wired Lamp

Last week was a long week in our household. Seems perhaps someone may be teething which means mommy is finding very little time to work on her to-do list. Sadly, the only thing I was able to work on was a lamp that I had picked up for $3.99 from the thrift store. It is a cast iron lamp that looked like it could use a bit of love.


The cord looked as though it had been chewed through by somebody's pet so I knew I had to re-wire the lamp. I also was thinking of re-painting it. I went to Menards and bought a $6.00 lamp kit and was able to re-wire during a very short nap my little guy took last week. While working on the lamp I fell in love with the worn look and decided not to spray paint. I actually really like how shabby chic it looks! 


Now I just have to find the right lamp shade and I will have the perfect lamp for my sewing table! :) 


Pin It

Tuesday, June 12, 2012

Bathroom Shelf


A closet-sized bathroom has been quite the challenge in our house. With no linen closet and very tight spaces I decided it was time for a shelf to help keep some of our bathroom supplies and guest towels. And it just tickled my fancy that I found a shelf at the thrift store for $3.99 right after deciding I wanted one.

I wish I would have thought to take a picture before I dived into fixing it up but I didn't. The shelf was stained a honey blonde so I quickly sanded it down (sanding a flat surface was a walk in the park in comparison to some of our more recent projects), and began priming. Following a coat of primer I added some black paint on all edges. Once this dried I dabbed some Vaseline along the edges and then spray painted the whole thing white. Once dry I lightly sanded edges! Must say, love the Vaseline trick!

All that was left to do was to hang it and top it off with a basket and some Mason jars of supplies. I think I will add a photo frame to the mix in the next couple of days. I found one for 99 cents at the thrift store that I will spray paint to be a nice deep red for a pop of color!


Not too shabby for 4 bucks, right?!


Pin It

Monday, June 11, 2012

How to Re-Upholster an Arm Chair


Upholstering an arm chair?! Seemed like I was in over my head when I came up with this idea. The whole ride home from the flea market I thought to myself, can I really make this thing look better than it does? I told my husband this was a wise purchase and now it seemed I had so much to prove. Well guess what . . . upholstering really isn't as daunting as it seems! And I am here to help walk you through the steps that I found worked well!

What You Will Need:

- A Chair
- Fabric - and plenty of it (always buy extra to allow for mistakes)
- Fabric Shears
- Electric Sander
- Spray Paint or Stain
- A Staple Gun (one that runs on electricity)
- Staples
- Hot Glue Gun and Glue
- Needle and Thread

(You may also need upholstery nails but only if the ones you pull out of the chair are not salvageable).


Step 1:
Take off existing fabric. This can be a challenge based on how the chair is put together. Definitely do not cut holes. Find a seam and use a seam ripper or scissors to cut away the seam.


From there you can see how everything is put on. For the back of my chair there was a hidden seam along the bottom back . . . I was able to rip the seam and slowly pull up to discover that the back fabric was held on by hidden rows of upholstery nails on both sides and staples along the top. You will be as surprised as me to discover a lot of the upholstery is put on using cardboard strips!

Once I removed this entire back panel everything else on the chair back was done with staples. Grab some pliers and carefully remove all staples and possibly some nails used to anchor corners. Learn from my mistakes and WEAR WORK GLOVES! It will save you from needing to keep bandages near! :)  The seat of my chair was simple, all staples and nails. If the bottom fabric is good you can re-use it again, usually it is just a dark cotton fabric so it saved me from dipping into my stash, after all, no one sees the bottom of your chair.


All of my chair padding was in great shape with no stains . . . so I was able to move on!


Step 2:
Remove arms and legs if you can. I was able to remove the arms of my chair but the legs were all a part of the structure so I left these on. For the next few steps I simple took a fitted sheet and wedged it around all padding to keep it clean!

Step 3:
Painstakingly remove all paint or stain with a sander. I must give all the credit to my husband on this one. Thank goodness for his perfectionism and patience! He spent 2 afternoons sanding the chair since I was under the weather but did not want to fall behind in my projects.


Step 4:
Prime, paint and varnish (or pre-treat, stain, and protect)! I used a spray primer on my chair followed up by some spray paint in an off-white color. I then topped it off with a clear spray varnish.

Step 5:
Lay all old fabric pieces on top of your new fabric and use them as a pattern. Be sure to unfold and spread each piece out. You want to be sure to have the same cuts.

Step 6: 
Begin recovering your chair. I started with the back of the chair since it looked to be more complicated. Rebuild it opposite of how you disassembled. Be sure to stretch your pieces nice and taught so that you have no wrinkles or slack in your finished chair. Piece of advice: I would hot glue a piece before stapling to help keep things where I wanted! I also found hot glue to be super useful when going around the legs. It allowed me to fold the fabric to perfectly cover as I wanted.

Step 7: 
Re-attach all pieces . . . arms and legs. Be sure to pull fabric to cover gaps before tightening screws.

Step 8:
Use hidden stitches to sew any seams that are needed. I had to sew a seam along the back of my chair and at the front 2 corners of the seats to keep it looking nice and neat.


Step 9:
Spray your upholstery with some scotch gard and use a nice wax finish on wood pieces. Attach felt to the feet if you have hardwood floors and then find the perfect spot in your home for your new chair!

My new $20 flea market chair with a $16 face lift! 
Pin It

Monday, June 4, 2012

Ugly Side Table to Shabby Chic Hall Table

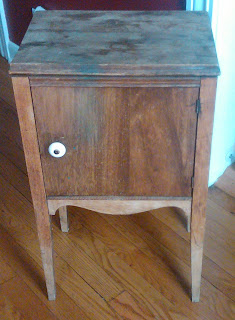
I spent the week working hard to find all the supplies I would need for a weekend of renovating our thrift finds from the end of May. Once all was finally obtained I was able to tackle my first project . . . the ugly $8.00 table from the flea market.


I apologize ahead of time for the fuzzy photos. My camera broke and is in the shop so I am working with the cell phone camera for the next week or two. And because I was short my camera I fear I did not remember to take pictures of all of my steps. In any case, I started by taking the door off and removing all hardware. I lightly sanded the entire table since there was no real finish to it. I then used wood glue to apply 2 wood appliques to the front of the door to jazz it up a bit!

Once the glue was set I primed and spray painted the entire table. I used plain white for this project. I then let the table dry overnight. The next day I sanded all the edges on the table using an 80 grit sanding block. 


I then went over all the sanded edges with an ebony wood stain using a foam paint brush. As you can see I was not careful to be neat.  


I let this sit for a few minutes and then used a towel to wipe off all my excess. I did all the edges and the appliques using this technique. I also swiped a few strokes of stain across front of door and top of table and wiped off to allow some stain to fall into all of the age marks to help define them! I then took some scrapbook paper I had found at Hobby Lobby for 59 cents a piece and cut them to fit all interior sides of the table, including the back of the door. I used Mod-Podge to adhere the paper and also used Mod-Podge over the top of the paper. I let this dry and then spray varnished the whole piece. I then affixed a new door knob I found at Hobby Lobby for $1.99 on sale and re-attached the door. 

Voila!


A great new table for my tiny hallway! Perfect for storing all my candles and aroma oils!


Not bad for a total of $17.93! 


Linking up to Homespun Happenings:
Homespun Happenings
Pin It